
How to Save an Overwatered Tropical Plant Before Root Rot Strikes
Why Your Tropical Houseplant Is Sulking and Why You Should Not Panic
Overwatering is one of the most common ways plant lovers show a little too much kindness, particularly when autumn arrives in the UK. A tropical plant that looked thirsty and lively through summer may suddenly spend weeks sitting in damp compost once the days become shorter. The good news is that a droopy, unhappy plant is not automatically a lost cause. Early action can often restore healthy roots before serious rot takes hold.
When central heating starts running, the air around leaves becomes drier, but that does not mean the compost dries quickly. Lower light reduces photosynthesis and growth, so the plant uses less water. Cooler windowsills, limited ventilation and dense compost can leave the root ball wet far longer than expected. If the plant is showing soft drooping, yellowing or a persistently damp pot, pause before watering again and use the following checks to understand what is happening.
Telltale Signs of Saturated Soil Before True Rot Sets In
Wilting is confusing because both thirst and excess water can make leaves hang down. An underwatered plant usually has dry, lightweight compost, crisp or curled foliage and a pot that feels noticeably lighter. With overwatering, the compost remains cool and wet, leaves often feel soft rather than crisp, and yellowing commonly begins with older lower leaves. A plant affected by root damage may still wilt even though the compost is saturated, because injured roots can no longer absorb water effectively.
Look for several clues together rather than relying on one leaf. A musty smell, green mould on the compost surface, fungus gnats hovering around the pot and a soft stem base all suggest that moisture has persisted too long. Leaf symptoms can have several causes, so it is sensible to consider light, temperature, pests and drainage as well. The RHS guidance on leaf damage also stresses that watering, airflow and root condition need to be assessed together.
| What you notice | More likely explanation | What to do next |
|---|---|---|
| Dry compost, crispy edges and a very light pot | Underwatering | Rehydrate gradually once the root ball is confirmed dry |
| Wet compost, soft yellow leaves and a musty smell | Overwatering or early root stress | Stop watering and inspect the root ball |
| Persistent wilting despite wet compost | Possible root damage | Unpot carefully and check root firmness |
| Fungus gnats around the surface | Compost staying damp | Improve drying, airflow and drainage |
The Gentle Root Firmness Check
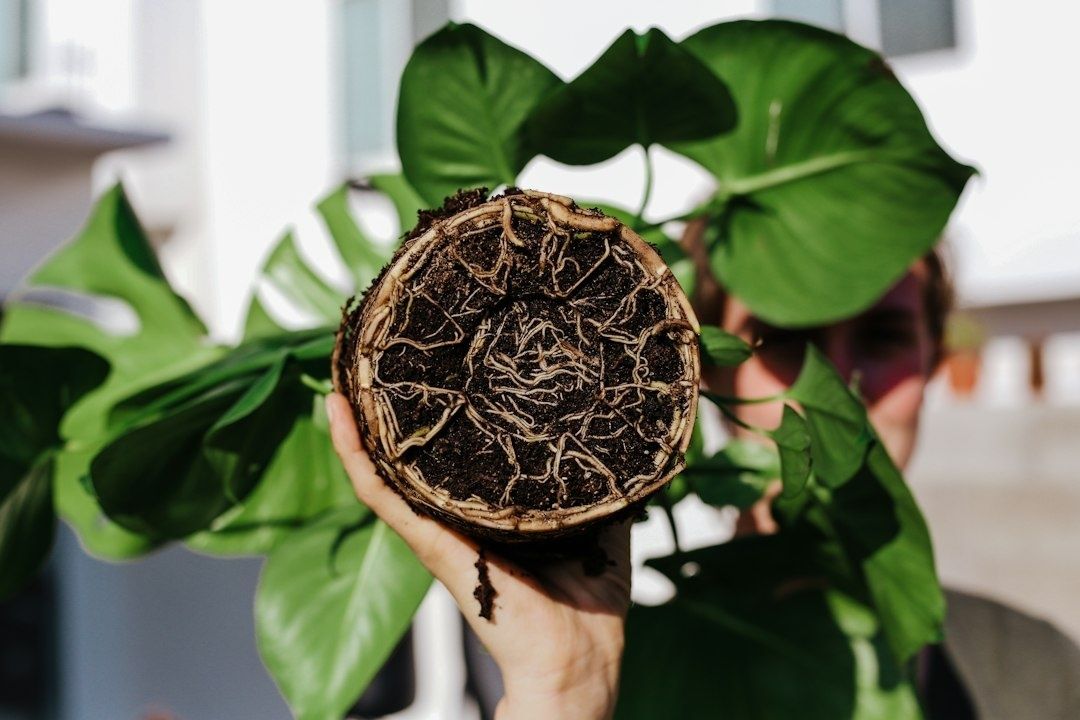
Move the plant to a washable surface and support the stems close to the compost line. Tilt the pot sideways, then slide out the root ball while holding the plant gently rather than pulling on its leaves or stalks. If the plant is stuck, squeeze flexible nursery-pot sides or tap the rim. Avoid tugging, because fine feeder roots can tear even when the larger roots look healthy.
Healthy tropical roots are generally firm and plump, with white, cream or light tan colouring depending on the species. They may be tightly packed, but they should resist gentle pressure. Damaged roots tend to be brown or black, hollow, slimy or mushy, and may detach when lightly touched. A few damaged strands do not necessarily mean the plant is beyond saving. The aim is to remove compromised tissue while retaining as much living root as possible.
Waterlogged compost contains fewer air spaces, reducing the oxygen available for root respiration. Stressed roots then become easier targets for water-mould pathogens and other opportunistic organisms. This is why simply adding more water to a wilted plant can accelerate decline. Background information from this horticultural extension guide to root rot explains how saturated conditions and poor aeration contribute to root disease.
- Keep firm white or tan roots, even if they are fine and delicate.
- Remove roots that are black, soft, hollow, foul-smelling or easily detached.
- Rinse away clinging compost with room-temperature water so hidden damage is visible.
- Use sterilised, sharp shears and wipe the blades between cuts.
- Do not remove healthy green leaves unnecessarily, as they still provide energy for recovery.
Trim damaged sections back to firm tissue, cleaning the shears again if they touch rot. Wash the pot thoroughly before reusing it, and discard old compost rather than mixing it into fresh material. If nearly all roots are affected, healthy stem cuttings may provide a useful backup for suitable plants, although propagation methods vary between species.
Emergency Aeration and the Chunky Substrate Rescue
Once the plant is out of the pot, the immediate priority is to reduce excess moisture and restore air around the roots. If the root ball is merely wet, not rotten, wrap the outside loosely in absorbent kitchen towel or newspaper for a short period and replace it when saturated. Do not squeeze the root ball hard, as this can crush fine roots. This temporary wicking step is helpful when a full repot is not immediately possible, but it should not replace inspection.
For a rescue repot, use a clean nursery pot with several generous drainage holes. A simple triage blend can combine peat-free houseplant compost with coarse perlite and orchid bark. The compost supplies organic material, while perlite creates air pockets and bark keeps the mix open instead of allowing it to collapse into a dense block. Standard multipurpose compost can hold too much moisture around aroids and other tropicals during the darker UK months, particularly when it is packed firmly into the pot.
Water-mould disease becomes more likely when moisture remains trapped around roots without sufficient airflow. Guidance from the University of California water-mould management resource highlights the importance of avoiding persistently wet conditions. The goal is not to make the mixture bone dry or harshly gritty, but to create a balance in which water drains away while a small amount of moisture remains available.
- Choose a pot only slightly larger than the remaining root ball, with clear drainage holes.
- Place a little chunky mix in the base and position the plant at its previous depth.
- Fill around the roots loosely, allowing the bark and perlite to maintain air spaces.
- Do not press the compost down firmly. Settle it with a light tap instead.
- Give only a modest drink if the roots were heavily washed or the new mix is completely dry.
- Empty any saucer or decorative cover soon after watering.
Do not add a layer of stones at the bottom of the pot as a substitute for drainage. That arrangement can raise the zone where water sits rather than improving it. Good drainage comes from open compost, unobstructed holes and sensible watering. Keep the recovering plant in bright, indirect light, away from a hot radiator and away from cold draughts while it rebuilds its root system.
Resetting Your Winter Watering Rhythm in a British Home
Calendar watering is convenient, but tropical plants do not use the same amount of water every seven days. Check the compost first. Push a finger a few centimetres into the surface, or lift the pot to compare its weight with how it feels after watering. A wooden stick can also reveal damp compost below the surface. Wait until the appropriate upper layer has dried for the plant before watering again, remembering that a plant with damaged roots may need less water than a fully established specimen.
Location matters as much as technique. Radiator heat can dry leaves and create crispy tips, while a cold windowsill can slow root activity and keep compost wet. Bright filtered light, gentle ventilation and stable temperatures are generally more helpful than placing the plant directly beside a heat source. The RHS houseplant advice recommends looking at light, water, temperature, humidity and airflow as a complete growing environment.
- Check moisture before every watering, even if the usual watering day has arrived.
- Water thoroughly only when needed, then let the pot drain fully.
- Keep leaves clear of cold glass and avoid sudden temperature changes.
- Improve gentle airflow by spacing plants apart and ventilating when practical.
- Pause feeding until fresh growth appears and the plant is clearly recovering.
- Remove only leaves that are fully damaged, keeping mostly green foliage for photosynthesis.
Watch Your Revived Tropical Push Out Fresh Green Growth
Recovery is rarely instant. A plant may need two to four weeks, or longer, to show renewed vigour after root stress. The first encouraging signs can be subtle: the compost dries at a more normal pace, leaves stop deteriorating, stems feel firmer and the plant holds itself upright for longer. Fresh growth is the clearest evidence that the remaining roots are functioning, but avoid rushing the process with extra water or fertiliser.
An overwatering mistake is useful information rather than a gardening failure. It reveals how quickly winter conditions change and encourages better habits, such as checking pot weight, using a chunkier mix and observing the plant before reaching for the watering can. Give those newly aerated roots warmth, light and breathing space. With patience and a lighter touch, many tropical houseplants can settle back into healthy growth before spring arrives.